
Our Blog
How Professionals Dry, Dehumidify, and Prevent Secondary Damage
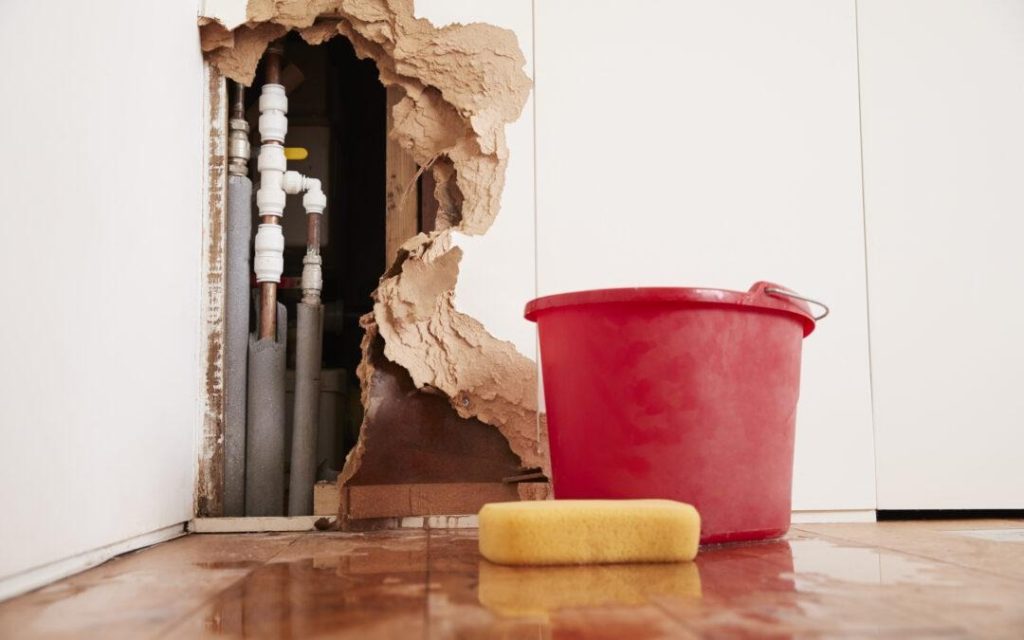
When water damage occurs, quick action makes all the difference. While towels and fans may seem helpful at first, professional drying and dehumidification go far beyond surface-level fixes.
How Professional Water Damage Restoration Prevent Secondary Damage
Trained water damage restoration Hawaii teams use specialized tools and proven methods to remove moisture thoroughly and prevent secondary damage that can cost far more in the long run.
Assessing Moisture Beyond What You Can See
Professionals start by identifying where water has traveled, not just where it is visible. Using moisture meters and thermal imaging, they detect hidden dampness inside walls, floors, and ceilings. This step is crucial because trapped moisture often leads to mold growth or material failure later on.
By locating affected areas early, professionals create a targeted drying plan. As a result, they avoid unnecessary demolition while still addressing all problem zones.
Controlled Drying Protects Structural Materials
Rather than relying on random airflow, professionals use high-powered air movers placed strategically throughout the space. These machines increase evaporation without damaging materials like hardwood, drywall, or insulation.
At the same time, technicians monitor temperature and airflow to ensure even drying. This controlled approach prevents warping, cracking, and shrinking that can occur when materials dry too quickly or unevenly.
Dehumidification Removes Moisture from the Air
As water evaporates, it raises indoor humidity levels. Without proper dehumidification, moisture simply settles back into building materials. Professionals use commercial-grade dehumidifiers to pull excess moisture from the air and maintain safe humidity levels.
Because these systems work continuously, they speed up drying while reducing the risk of mold growth. Consequently, the environment becomes stable enough for materials to fully recover.
Preventing Mold Before It Starts
One of the biggest risks after water damage is mold development. Professionals apply antimicrobial treatments to affected areas once drying begins. These treatments inhibit mold and bacteria growth during the restoration process.
In addition, technicians frequently recheck moisture levels to ensure conditions remain unfavorable for microbial activity. This proactive approach significantly lowers the chance of future contamination.
Protecting Electrical and Mechanical Systems
Water can easily reach outlets, wiring, and HVAC components. Professionals take extra care to dry these systems safely or recommend qualified inspections when needed. This step reduces fire hazards and prevents system failures caused by lingering moisture.
By coordinating drying with electrical and mechanical considerations, professionals ensure the entire property remains safe and functional.
Monitoring Progress to Avoid Secondary Damage
Drying is not a one-time task. Professionals monitor moisture levels daily and adjust equipment as conditions change. This ongoing evaluation ensures that drying stays on track and finishes properly.
Without monitoring, materials may appear dry while moisture remains trapped inside. By verifying results, professionals prevent issues like mold, odors, and material breakdown from developing weeks later.
Restoring Normal Conditions Efficiently
Once moisture levels return to acceptable ranges, professionals remove equipment and confirm that indoor conditions are stable. At this point, repairs and rebuilding can proceed without risk of future complications.
This careful transition prevents setbacks and keeps restoration timelines predictable.
Conclusion: How Professional Water Damage Restoration Prevent Secondary Damage
Professional drying and dehumidification protect properties from far more than visible water damage. Through careful assessment, controlled drying, effective dehumidification, and continuous monitoring, experts prevent secondary damage that can impact both structure and health. Acting quickly and trusting trained professionals ensures a faster recovery, lower repair costs, and a safer environment for everyone involved.
Choosing the Right Paint Color for Your Deck
Your deck undergoes a lot of wear and tear, just like any outdoor area. Its age, the heat of the sun, and the weather can break down your deck. However, if you regularly maintain them, they will last longer.

Choosing the right finish and color is important when it comes to picking an exterior paint color. However, how do you pick the correct color? If you aren’t planning to hire a house painting Auburn Hills company, here are several things you should consider:
What is the Color Scheme of Your Exterior?
You should look at the existing accents, trim, and paint color of your home’s exterior. After that, make sure you utilize the paint guide or color wheel to help you lock in a color that will match the color scheme and style of your house.
Old-style houses can go with a brown, gray, or reddish hue. On the other hand, modern houses will lean toward neutral or gray. However, your overall scheme will totally land you in the correct color zone.
You should test out the shades after you have narrowed down the color list. You can do this by painting a small spot on the deck. Next, look at the shades at various times of the day and various lights when you’re choosing out a paint color.
If you don’t want to do that, you can simply upload a photo of your deck to a painting website and virtually try on the color.
How Can You Best Protect the Deck?
Is your deck in the full sun? Is it shaded? Is it screened? Places that get a lot of sunlight require more protection compared to shaded places. High traffic places such as walkways and stairs require more durable finishes compared to handrails.
Also, you will want something you can regularly clean or power wash as well.
What Is Your Deck Made of?
Your deck’s material influences how flexible you can be with color. Composite and wood decks usually provide the most options. They can be almost any color. When it comes to concrete decks, you cannot paint them. However, you stain them.
Furthermore, the fewest color choices are the brick paver. A couple might stain. However, almost every one of them will not take extra color.
What is the Big Picture?
Though your deck is a structure that’s independent, it is also part of the entire setting of your house. thus, you should begin by considering the context of your grounds and home.
- What Other Landscaping Elements Do You have That May Affect Color?
Landscape elements such as stone, concrete, or brick can act as a guide as well. For instance, a red brick will pair well with a gray deck. On the other hand, a tan will work well with natural stone.
- Does Your Deck Directly Connect to Your Home?
Decks connect to your home are considered an extension. Thus, it makes sense if the indoor flooring of your home may be a great jumping-off color for the deck that you have.
Common Causes of Paint Bubbling
Of course, the last thing you want to do after spending a lot of time painting your house is waking up and see the paint bubbling. So, why does the paint bubble? Today, we are going to talk about it.

Blistering, commonly known as paint bubbling, occurs if paint loses its surface adhesion. The surface may be a layer of paint beneath the one you applied. It can also be the substrate, such as wood, plaster, or drywall.
Air or water-filled bubbles develop if paint is not sticking to the surface. They can harden in place if they collapse as the paint dries. At any time, paint coats can loosen. This includes water- and oil-based paint, even if the paint was already applied many weeks ago.
You can paint over the surface if you want. However, that is not a permanent answer to your problem. The reason for this is that the paint would probably form bubbles again. Here are several reasons why your house painting Grand Blanc leads to paint bubbles.
Utilizing the Wrong Paint, Tools, or Method
In general, it is ideal to utilize more paint that is oil-based if you’re painting over the same type of paint. Applying latex paint over an existing oil-based paint will probably lead to the paint the bubble. The reason for this is that the two types of paint cannot bond properly. However, latex has a couple of advantages when compared to oil-based paints. This includes quicker drying time, less smell, and lower VOCs. Thus, you will have to prepare the oil-based paint if you are planning to paint latex paint over oil-based paint. You can do this by using a sandpaper to get rid of the paint. This will rough the surface up. Next, you have to clean it using TSP. After that, you have to prime it. Lastly, you should utilize at least 2 layers of latex. Also, you have to ensure you utilize the correct roller or brush. Ask a paint expert if you aren’t certain of the correct tool for your paint project.
Heat
Paint bubbling is more common in areas exposed to heat. This includes rooms or kitchens that get a lot of sunlight. This is not so much of an issue of adherence since it’s a problem of drying. The upper layer of paint unevenly dries at a faster rate in intemperate areas. This causes bubbles under the surface.
Moisture
Moisture from high humidity, leaks, or water droplets can all soak into the surface. This produces bubbles between the paint and the surface. These forms of bubbles occur in areas where dampness is common. This includes kitchens and bathrooms.
Skipping the Primer
You might think that it’s okay to skip the primer. However, your walls do not agree with that. Primer is not simply the attempt of the paint industry to sell you another product. A primer layer produces a less porous surface so that both pigments and binders can stick to the surface. To make things simple, it offers your paint something to adhere to. That is the reason why you should not skip the primer. Else, it will develop bubbles.
Recent Comments